Why Is It Important to Export Videos Correctly?
Exporting a video is the final step in Adobe Premiere Pro, determining the quality and compatibility of your content with publishing platforms. Mistakes at this stage can ruin all the effort you’ve put into editing. For example, choosing the wrong resolution or bitrate can degrade video quality or make it unsuitable for uploading to YouTube, Instagram, or TikTok.
Correct settings help balance quality and file size. This is especially important if you’re working with limited internet bandwidth or creating videos for different platforms. Each platform has unique requirements for format, resolution, frame rate, and bitrate. Ignoring these parameters can result in poor-quality video or rejection during upload.
Additionally, proper export settings ensure smooth playback on users’ devices. For instance, too high a bitrate can make the file too large for quick uploads, while too low a bitrate can degrade image quality. That’s why it’s crucial to understand how to configure exports for specific tasks.
What You’ll Learn in This Article
In this article, you’ll find a step-by-step guide to exporting videos in Premiere Pro. We’ll cover key export parameters like resolution, bitrate, and file format, as well as provide optimal settings for popular platforms (YouTube, Instagram, TikTok). We’ll also discuss advanced techniques for professionals, common mistakes, and helpful tips for achieving the best results.
- How to set up your workspace for maximum efficiency.
- The differences between Pixel Brushes, Live Brushes, and Vector Brushes—and when to use them.
- A step-by-step guide to creating a complete illustration from scratch.
- Advanced techniques like blending modes, masking, and exporting files for various purposes.
- Real-world examples of projects created in Fresco, from portraits to character designs.
Basics of Exporting in Premiere Pro
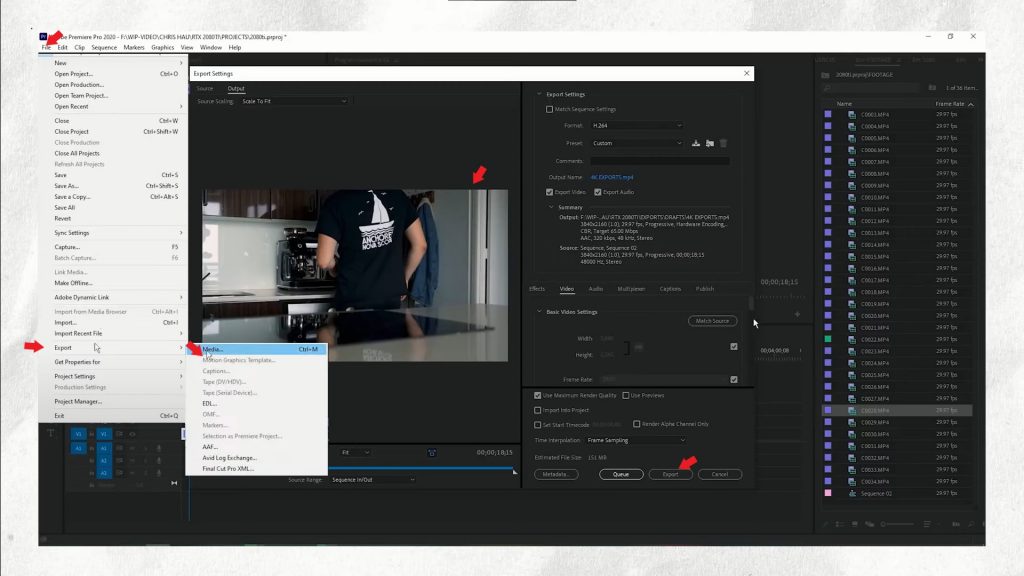
Step 1: Open the “Export Media” Panel
- Go to the menu File > Export > Media or use the shortcut Ctrl+M (Windows) / Cmd+M (Mac). This opens the export window, where you can configure settings for your video.
- In the left part of the window, you’ll see a preview of the video. Here, you can check how your settings will look before exporting.
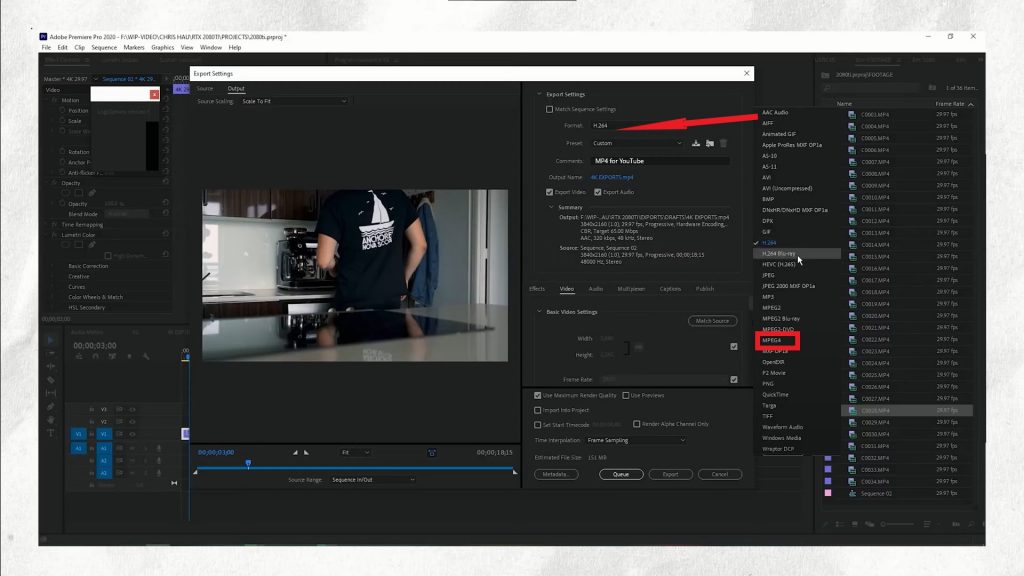
Step 2: Choose the File Format
- The most popular formats:
- MP4: This format is universal and suitable for most platforms due to its excellent balance of quality and file size. It’s widely used for YouTube, Instagram, and other platforms.
- MOV: Ideal for professional use, especially if you plan to further edit in programs like After Effects or DaVinci Resolve. MOV supports higher quality but results in larger files.
- AVI: Used less frequently because files in this format take up a lot of space. However, it can be useful for short projects requiring maximum quality.
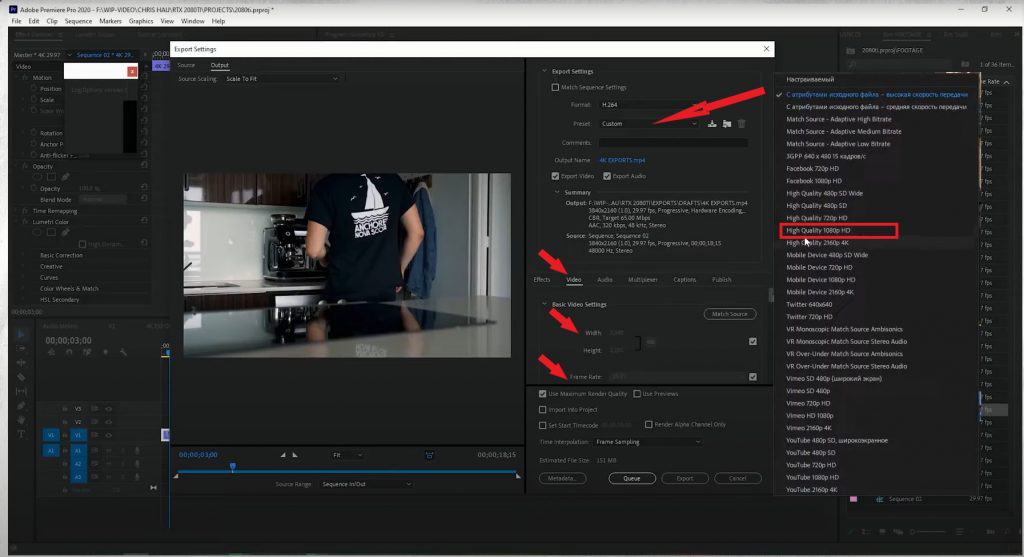
Step 3: Set Resolution, Frame Rate, and Bitrate
- Resolution:
- 1080p (1920×1080): Standard resolution for most platforms. It ensures excellent video quality without significantly increasing file size.
- 4K (3840×2160): For high-quality projects like commercials or films. Note that 4K video requires more processing time and storage space.
- Frame Rate:
- 24fps: This standard is used in the film industry and creates a “cinematic” smoothness.
- 30fps: Standard for most platforms like YouTube and Instagram.
- 60fps: Suitable for dynamic clips or slow-motion scenes. For example, if you want to create a slow-motion effect, use 60fps.
- Bitrate:
- CBR (Constant Bitrate): A constant bitrate is suitable for simple projects where video quality doesn’t vary significantly.
- VBR (Variable Bitrate): A variable bitrate provides better compression quality. VBR, 2-pass is the most recommended option as it analyzes the video twice for optimal quality.
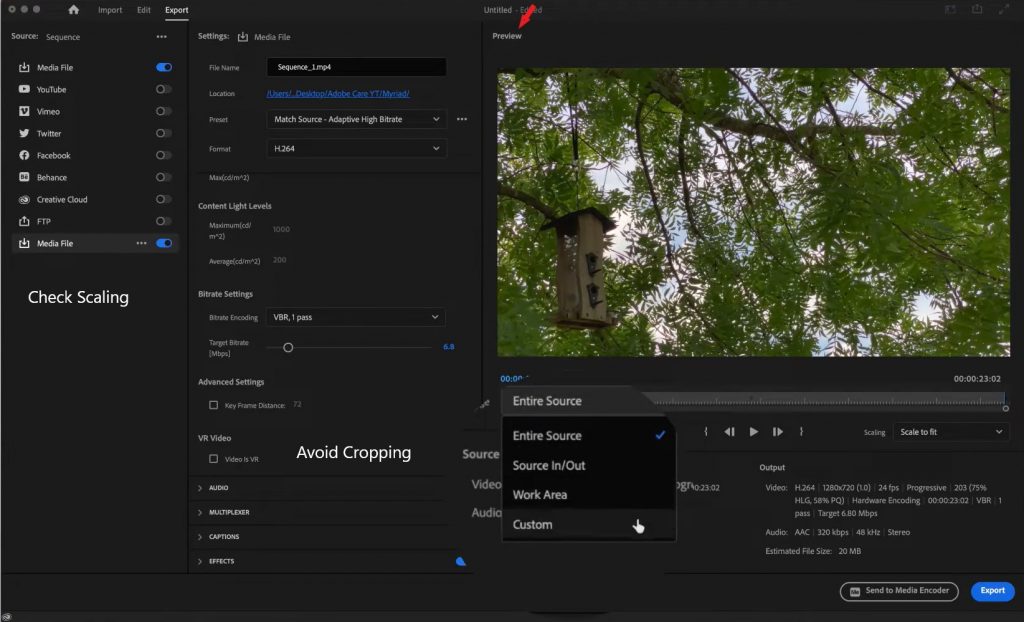
Step 4: Check the Preview Before Exporting
- Click the Preview button at the bottom of the export window to ensure all settings are correct. This helps avoid errors like cropping video edges or incorrect scaling.
Key Export Parameters
- Resolution:
Resolution determines image clarity. Your choice of resolution depends on the purpose of your video. For example, use 1080p or 4K for YouTube, and 1080×1920 for Instagram Stories. - Bitrate:
Bitrate affects video quality and file size. The higher the bitrate, the better the quality, but the larger the file size. For YouTube, it’s recommended to use a bitrate of 8 Mbps for 1080p and 16 Mbps for 4K. - Frame Rate:
Frame rate determines how many frames are displayed per second. It should match the frame rate of your source material. For example, if you shot video at 30fps, export it at 30fps. - Audio:
Don’t forget to adjust audio settings. Use the AAC format with a bitrate of 192 kbps for most platforms.
Optimal Settings for Different Platforms
Setting Up Your Document
YouTube
- Format: MP4.
- Resolution:
- 1080p (1920×1080): Standard resolution for most videos.
- 4K (3840×2160): For high-quality projects.
- Bitrate:
- VBR, 2-pass.
- Minimum bitrate: 8 Mbps for 1080p, 16 Mbps for 4K.
- Frame Rate: 24fps or 30fps.
- Example:
- If your video contains a lot of text or graphics, increase the bitrate to 10 Mbps to avoid artifacts.
- Use the H.264 codec for better compression quality.
Format: MP4.
Resolution:
Stories/Reels: 1080×1920 (vertical video).
Posts: 1080×1080 (square video).
Frame Rate: 30fps.
Bitrate: 5 Mbps.
Example:
For Stories, add black bars at the top and bottom if your source material isn’t vertical.
For Posts, use square video as it takes up more space in the feed.
TikTok
Format: MP4.
Resolution: 1080×1920.
Frame Rate: 30fps.
Bitrate: 5 Mbps.
Example:
Use maximum brightness and contrast to make your video stand out in the feed.
Add text elements, as TikTok actively uses text for audience engagement.
Vimeo
Format: MP4.
Resolution: 4K.
Bitrate:
VBR, 2-pass.
Minimum bitrate: 16 Mbps for 4K.
Example:
Vimeo prefers high-quality video, so choose 4K even for short clips.
Use the H.265 codec for even better compression without losing quality.
Format: MP4.
Resolution: 1080p.
Frame Rate: 30fps.
Bitrate: 8 Mbps.
Example:
For ad videos, use square video (1080×1080), as it takes up more space in the feed.
If you’re creating Stories, use vertical video (1080×1920).
Advanced Export Techniques
Advanced Techniques for Professionals
- Use Maximum Render Quality:
- This option is activated in the export settings. It improves video quality during scaling, especially if you’re changing the resolution of the source material. For example, if you’re exporting 4K video from 1080p source material, this option helps avoid blurriness.
- To enable this feature, find the “Maximum Render Quality” option in the export window and check the box. This may increase processing time, but the result will be significantly better.
- Export with Alpha Channel:
- Used to export video with a transparent background. Useful for graphic projects like logos or animations.
- Format: MOV or AVI with the Animation codec.
- Example: If you’re creating a logo animation, use this option to preserve transparency and easily integrate the video into other projects.
- Batch Export:
- Export multiple files simultaneously.
- Create several sequences in Premiere Pro and use Adobe Media Encoder for automatic processing.
- Example: If you’re creating a series of short videos for social media, add all files to the Media Encoder queue and start the export with one click.
- Custom Presets:
- Create custom export templates for frequently used settings.
- Example: “YouTube 1080p” or “Instagram Stories.”
- To create a preset, configure the export settings, click the “Save Preset” button, and name it. You can now use this preset for future projects.
- Match Source Settings:
- Automatically applies the settings of the source material.
- Convenient if you want to preserve the original quality without manual configuration.
- Example: If your source material is 4K with a frame rate of 60fps, Premiere Pro will automatically apply these parameters.
Common Mistakes and How to Avoid Them
5 Common Mistakes When Exporting
- Incorrect Resolution Selection:
- Using too low a resolution can degrade video quality. For example, exporting 720p video for YouTube may look blurry on a large screen.
- Solution: Always choose a resolution that matches your source material. For YouTube, use a minimum of 1080p.
- Using Too High a Bitrate:
- This increases file size without significantly improving quality. For example, a bitrate of 20 Mbps for 1080p video is excessive for most platforms.
- Solution: Use recommended bitrate values. For 1080p, 8 Mbps is sufficient, and for 4K, 16 Mbps is ideal.
- Forgetting to Check the Preview:
- Always check the video before exporting to ensure all elements display correctly. For example, text overlays may be cropped if you don’t account for aspect ratio.
- Solution: Click the Preview button at the bottom of the export window and carefully review the video.
- Mismatched Frame Rate:
- Using a different frame rate during export can cause playback issues. For example, if your source material was shot at 24fps and you export at 30fps, the video may appear sped up.
- Solution: Always use the same frame rate as your source material.
- Ignoring Platform Requirements:
- Each platform has its own recommendations for resolution, format, and bitrate. For example, Instagram Stories require vertical video (1080×1920), and TikTok prefers high brightness and contrast.
- Solution: Check the platform’s requirements before exporting.
Tips and Recommendations
Additional Tips for Effective Exporting
- Use Export Templates:
- Create custom presets to save time. For example, create a “YouTube 4K” preset with a resolution of 3840×2160 and a bitrate of 16 Mbps.
- Check Platform Requirements:
- Ensure your settings match the platform’s requirements. For example, for Facebook, 1080p and 30fps are preferred.
- Optimize File Size:
- Use VBR and 2-pass encoding to reduce file size without losing quality. This is especially important for mobile devices.
- Use Adobe Media Encoder:
- For large projects, it’s better to use Media Encoder to free up Premiere Pro for editing.
- Add Metadata:
- When exporting, include metadata such as video title, author, and keywords. This helps organize files and improves their visibility on platforms.
Ready to Export Videos Like a Pro?
Now that you know both basic and advanced export techniques, it’s time to put them into practice. The right settings will help you create high-quality content that will look great on any platform using Premiere Pro.
Don’t be afraid to experiment and try new approaches. Exporting videos is not only a technical process, but also a creative one. Every step you take brings you closer to perfection.
Share your results in the comments or tag us on social media — we will be glad to see your work!


Leave a Reply